
IMEHA (International Model Equine Hobbyists Association) was an online photo showing site that existing until 2018. Included on the site were these guidebooks for judging and showing model horses in Performance classes. MEPSA has obtained permission to share the info contained in the guides.
Riding Patterns :: Point Deducts :: Tack :: Rider :: Reins :: Set-Up Options :: Photo Examples
Reining is liken to dressage in theory with the judging based on the execution of a pattern and different levels of competition according to the horse’s experience. The horse is judged on smoothness of the performance, finesse, attitude and authority of performing various maneuvers while using a controlled speed. The moves in the pattern include sliding stops, spins, flying lead changes, loping circles, then hesitates and backs. The lope is the ONLY gait performed while on the pattern and any breaking of the gait is a disqualification. It is important to note that judging starts at the moment that the entrant enters the arena. The horse may walk or trot to the starting point of the pattern. An entry could be shown in which the horse that has completed the pattern is walking or trotting toward the judge for the required drop bridle. Also, please note that during the patterns themselves, that the horse may run, lope, slide, spin, hesitate, back.
No cross entering with Freestyle Reining.
Each horse will be judged individually on neatness, dispatch, ease, calmness, and speed with which it performs the required pattern.
Horses should rein and handle easily, fluently, effortlessly, and with reasonable speed. Any horse not following the pattern will be disqualified. Horses will be penalized if they do not keep the figure eights within the markers or otherwise follow the patterns outlined exactly.
A judge may require any contestant to repeat his performance of any or all of the various parts of the pattern.
Only one hand may be used on the reins (unless showing a Junior horse in a snaffle or hackamore), and that hand cannot be changed while riding the pattern. A rider may untangle excess rein, where excess rein may prevent the rider from continuing the pattern, where said excess can be straightened without affecting the performance of the horse, only during hesitations, or when settling a horse; the rider’s free hand may be used to hold the romal in the normal fashion.
The pattern to be used should be designated and posted at least 1 hour before the class is called.
Faults against the horse (to be scored accordingly but not to cause disqualification) are listed below. Refer to the AQHA Rulebook for specific penalty faults used in scoring:
- Opening mouth excessively when wearing bit
- Excessive jawing, mouth-opening, or head-raising on stop
- Lack of smooth, straight stop on haunches (bouncing or sideways stop)
- Refusing to change leads
- Anticipating signals
- Stumbling
- Backing sideways
- Knocking over markers
Faults against the rider (to be penalized accordingly but not to cause disqualification) are as follows:
- Losing stirrups
- Giving unnecessary aid (such as excessive spurring, talking, quirting, and jerking on the rein)
Patterns will be scored according to current AQHA rules. Scores will range from 0 to 100, with 70 denoting an average performance.
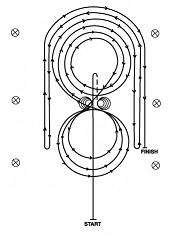
Suggested reining patterns are illustrated on the pages that follow:
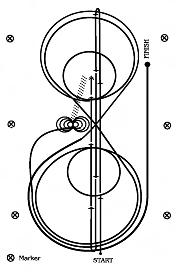
Pattern I (AQHA Pattern #1)
- Run at speed to the far end of the arena past the end marker and do a left rollback with no hesitation.
- Run to the opposite end of the arena past the end marker and do a right rollback with no hesitation.
- Run past the center marker and do a sliding stop. Back up to center of the arena or at least 10 feet (3 meters). Hesitate.
- Complete four spins to the right.
- Complete four and one-quarter spins to the left so that horse is facing left wall or fence. Hesitate.
- Beginning on the left lead, complete three circles to the left: the first circle large and fast; the second circle small and slow; the third circle large and fast. Change leads at the center of the arena.
- Complete three circles to the right: the first circle large and fast; the second circle small and slow; the third circle large and fast. Change leads at the center of the arena.
- Begin a large fast circle to the left but do not close this circle. Run straight up the right side of the arena past the center marker and do a sliding stop at least 20 feet (6 meters) from wall or fence. Hesitate to demonstrate the completion of the pattern.
Rider may drop bridle to the designated judge.
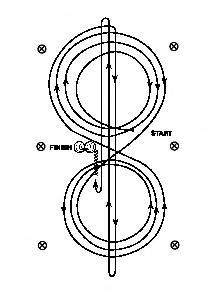
Pattern II (AQHA Pattern #2)
Horse must walk or stop prior to starting this pattern.
Begin at the center of the arena facing the left wall or fence.
- Beginning on the right lead, complete three circles to the right: the first circle small and slow; the next two circles large and fast. Change leads at the center of the arena.
- Complete three circles to the left: the first circle small and slow; the next two circles large and fast. Change leads at the center of the arena.
- Continue around previous circle to the right. At the top of the circle, run down the middle to the far end of the arena past the end marker and do a right rollback with no hesitation.
- Run up the middle to the opposite end of the arena past the end marker and do a left rollback with no hesitation.
- Run past the center marker and do a sliding stop. Back up to the center of the arena or at least 10 feet (3 meters). Hesitate.
- Complete four spins to the right.
- Complete four spins to the left. Hesitate to demonstrate the completion of the pattern.
Rider may drop bridle to the designated judge.
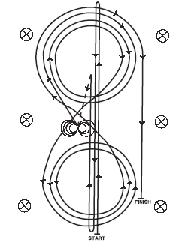
Pattern III (AQHA Pattern #4)
Horse must walk or stop prior to starting this pattern.
Begin at the center of the arena facing the left wall or fence.
- Beginning on the right lead, complete three circles to the right: the first two circles large and fast; the third circle small and slow. Stop at the center of the arena.
- Complete four spins to the right. Hesitate.
- Beginning on the left lead, complete three circles to the left: the first two circles large and fast; the third circle small and slow. Stop at the center of the arena.
- Complete four spins to the left. Hesitate.
- Beginning on the right lead, run a large fast circle to the right, change leads at the center of the arena, run a large fast circle to the left, and change leads at the center of the arena.
- Continue around previous circle to the right. At the top of the circle, run down the middle to the far end of the arena past the end marker and do a right rollback with no hesitation.
- Run up the middle to the opposite end of the arena past the end marker and do a left rollback with no hesitation.
- Run past the center marker and do a sliding stop. Back up to the center of the arena or at least 10 feet (3 meters). Hesitate to demonstrate completion of the pattern.
Rider may drop bridle to the designated judge
Reining Pattern IV (AQHA Pattern #7)
- Run at speed to the far end of the arena past the end marker and do a left rollback with no hesitation.
- Run to the opposite end of the arena past the end marker and do a right rollback with no hesitation.
- Run past the center marker and do a sliding stop. Back up to the center of the arena or at least 10 feet (3 meters). Hesitate.
- Complete four spins to the right.
- Complete four and one-quarter spins to the left so that horse is facing left wall or fence. Hesitate.
- Beginning on the right lead, complete three circles to the right: the first two circles large and fast; the third circle small and slow. Change leads at the center of the arena.
- Complete three circles to the left: the first two circles large and fast; the third circle small and slow. Change leads at the center of the arena.
- Begin a large fast circle to the right but do not close this circle. Run straight down the right side of the arena past the center marker and do a sliding stop at least 20 feet (6 meters) from the wall or fence. Hesitate to demonstrate completion of the pattern.
Rider may drop bridle to the designated judge.
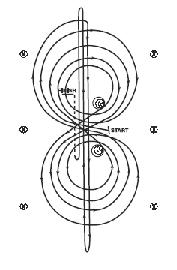
Reining Pattern V (AQHA Pattern #10)
- Run past the center marker and do a sliding stop. Back up to the center of the arena or at least 10 feet (3 meters). Hesitate.
- Complete four spins to the right.
- Complete four and one-quarter spins to the left so that the horse is facing the left wall or fence. Hesitate.
- Beginning on the right lead, complete three circles to the right: the first two circles large and fast, the third circle small and slow. Change leads at the center of the arena.
- Complete three circles to the left: the first circle small and slow, the next two circles large and fast. Change leads at the center of the arena.
- Begin a large fast circle to the right but do not close this circle. Run down the right side of the arena past the marker and do a left rollback at least 20 feet (6 meters) from the wall or fence with no hesitation.
- Continue back around the previous circle but do not close this circle. Run down the left side of the arena past the center and do a right rollback at least 20 feet (6 meters) from the wall or fence with no hesitation.
- Continue back around previous circle but do not close this circle. Run down the right side of the arena past the center marker and do a sliding stop at least 20 feet (6 meters) from the wall or fence. Hesitate to demonstrate completion of the pattern.
Rider may dismount and drop the bridle to the designated judge.
Extra Credit Should Be Given If:
(1) Split reins are used, the rein should fall on the same side as the rein hand.
(2) A romal rein is used; romal should fall on the opposite side from the rein hand (romal is usually held in the rider’s other hand.
(3) Entry Number is shown on saddle blanket or on rider’s back.
Points Should be Deducted If…
(1) Model exhibits excessive speed for gait assigned.
(2) Model is on the wrong lead.
(3) Model appears to display a slowness in any gait or loss of forward momentum resulting in an animated and/or artificial gait at the lope.
(4) Rider touches horse or saddle with free hand.
(5) Model’s head is carried too high.
(6) Model’s head carried too low tip of ear below the withers.
(7) Model is overflexed or has a strained neck in head carriage so the nose is carried behind the vertical.
(8) Model displays excessive nosing out.
(9) Model displays an opening mouth excessively.
(10) Rider uses spurs forward of the cinch.
(11) Model appears sullen, dull, lethargic, emaciated, drawn or overly tired.
(12) Model appears agitated has ears back, tail twirled, etc.
(13) Model displays quick, choppy or pony strides.
(14) Reins are draped to the point that light contact is not maintained.
(15) Model is overly canted at the lope. *When the outside hind foot is further to the inside of the arena than the inside front foot.
Required Tack:
A western stock saddle without tapaderos. The saddle can have either squared or rounded skirts with the current style leaning toward squared. With or without the rear cinch, sometimes adding “tabs” to occupy the rear girth slots; however, if a rear cinch is used, it must have a connecter strap to the front cinch. Breastplates are optional. Silver should not be counted over a good working outfit. A saddle pad resting under all pressure points is recommended but not required equipment. A western style bridle (browband, one ear, two ear, with or without throatlatch) with a curb bit including a curb strap or curb chain. Standard snaffle bit and bosal hackamores are permitted on horses 4 and under (5 and under for Arabians and Appaloosas). Romal reins and split reins are both legal; Romal reins are usually seen on Arabians, Morgans, and NSH.
Boots or leg protection are optional
Prohibited Tack:
Nosebands or cavessons, any type of martingale or tiedown, tapaderos, roping reins, crops or whips, mechanical hackamores are also prohibited. Split reins may not be knotted or attached to each other (stickwax is of course permitted in model horses) Rider may not have more than one finger between split reins or any fingers between the reins of a rein and romal.
Rider:
Attire is jeans, trousers or pants over western boots, long sleeved shirts, (vest, tie and jacket are also permitted) belt through loop, and western hat. Chaps are optional. The doll rider’s posture must be addressed because if you can’t get it correctly then don’t use it. Doll must sit down in the saddle, the back should be straight. There should be a straight vertical line between the rider’s ear, the elbow and the heel. The knee and toe of the boot should also be in a straight line, knees and feet turned straight along the side of the horse and heel of boot pointed down. The rein arm upper arm should be tucked into the side of the rider, elbow is bent and the forearm parallel to the ground. The free arm is held free and straight down with palm flat and lightly touching the leg. You may place ONE finger between your split reins and there is no rule as to which one – though most riders place their index finger between. If using romal reins the romal hand is carried with hand holding romal at the length of which the romal is straight and not curved. Hand then rest quietly near or on the doll’s leg. Hackamore or snaffle reins the riders hands should be carried near the pommel and not further than four inches (to scale) out on either side of the saddle horn. Rein hand wrist(s) of either rein is turned slightly inward. The doll rider’s head should be looking straight forward as if rider is looking through the horse’s ears.
Rein Hand Holds:

Rein Pull:
Horses are shown on a reasonable loose rein. Extremes such as too tight or too loose should be penalized.


Set-Up Options:
Arena Fencing Required (Indoor or Outdoor Arena)
Types of Fencing Allowed:
- Painted or Natural
- Post and Rail
- Post and Plank
- Chain Link
- Solid Plyboard
- Plyboard with Top Rail
- Post with Drape Rope
- Stock Tube Pipe Rail
- Interior Arena Wall
Footing Required:
- Dirt
- Sand
- No grass base
- No rock base
Backboard or Natural Setting (Indoor or Outdoor)
Examples of Reining Entries:
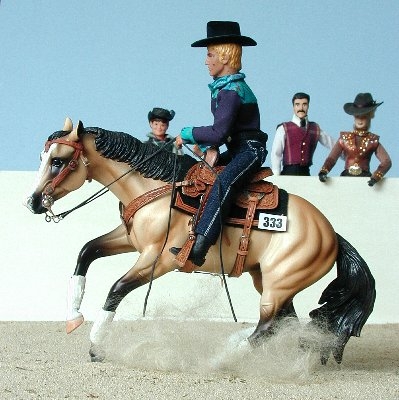
Photo Credit:
Reining – Spinning Mold
Double M Major Motion shown as a Buckskin QH Gelding and is a CM Creata Gold Standard Jacody by Wilgus. Shown by Andrea Robbins with the comment line: Entrant is performing the final SLIDING STOP of the REINING PATTERN, prior to backing up 10’ to signaling completion of the pattern to the judge or steward.
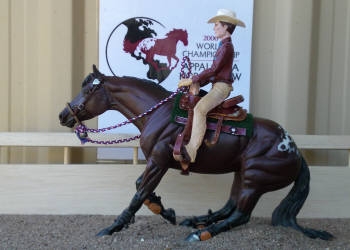
Photo Credit:
Reining – Sliding Mold
Legendary shown as a 3 y/o bay Appaloosa gelding and is a CM BHR Slider by Jameson. Shown by Joanna Richardson with a comment line: Hackamore/Snaffle Bit Reining. ApHC Pattern 1: Step 3: Run past center of arena, do a sliding stop (shown here), back straight, etc. (Center marker is out of photo because rider has run past it.)
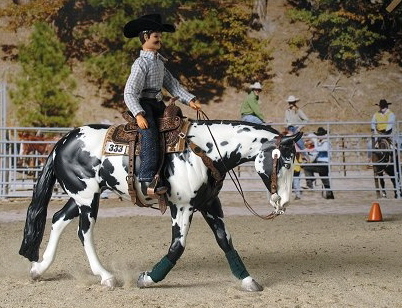
Photo Credit:
Reining – Jogging Mold
Adrenna Lynn sown as a Black Overo Paint Mare and is a Smokin HotChic by Clayton. Shown by Andrea Robbins with the comment line: REINING: ENTRY DEPICTS: NRHA, REINING PATTERN 5, which begins with the instruction: Horses may walk or trot to the center of arena. ENTRY is trotting to the starting point which is near the center of the arena, and will be in line with the marker cone. NOTE: In Reining competitions, the entrant is judged starting from the moment horse and rider enter the arena.
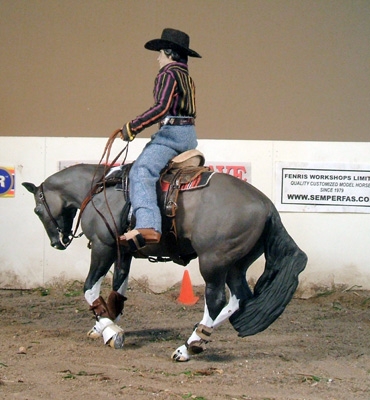
Photo Credit:
Reining – Radical Custom Mold – Backing
Our Gal Sal shown as a Grulla Minimal Tobiano Paint Mare and is a Breyer Rugged Lark CM. Shown by Sue Sudekum with the comment line: Reining: Backing after a sliding stop.
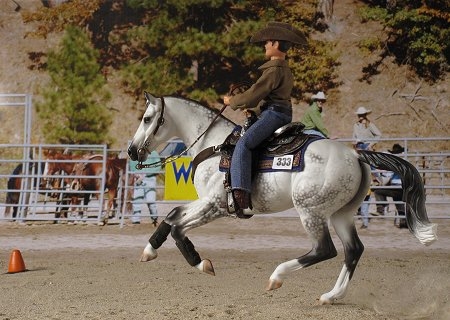
Photo Credit:
Reining – Loping Mold
Apparition shown as a dappled gray Hanoverian mare and is a CM Breyer Show jumper by Donahue. shown by Andrea Robbins with the comment line: USEF: REINING HORSE DIVISION: REINING PATTERN 2 STEP 5: Run past the center marker and do a sliding stop. ENTRY is running up the center of the arena, approaching the center marker. The rider begins to lean back just seconds before he will pull back on the reins to bring his horse to a sliding stop. Entry is competing using ROMAL REINS. The rider’s right hand holds the romal end of the reins.
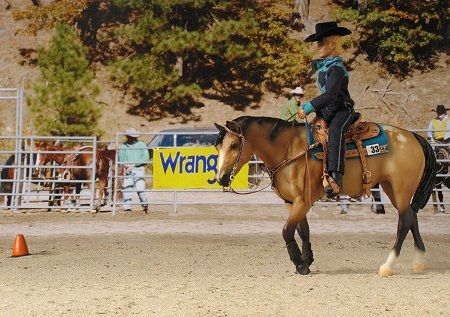
Photo Credit:
Reining – Walking Mold
Goody Four Shoes shown as a Dun patchy blanket American Mustang Mare and is an OF Breyer Indian Pony. shown by Andrea Robbins with a comment line: NRHA, REINING PATTERN # 5, which begins with the instruction: Horses may walk or trot to the center of arena. ENTRY is walking to the center of the arena, which will be in line with the marker cone.
Hold the Reins Correctly:
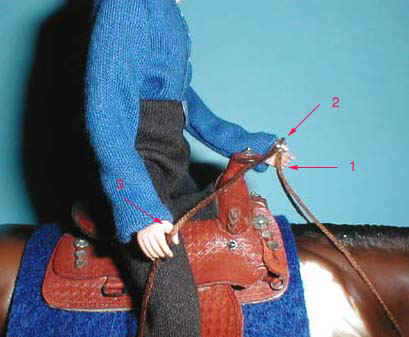
Photo Credit:
Romal Reins by Susan Hargrove
Romal reins enter the hand by the “little” finger lay across the palm of the hand and exit the hand on top over the thumb. The hand holds the reins and not the loop and knot that form the junction of the reins and the romal whip.
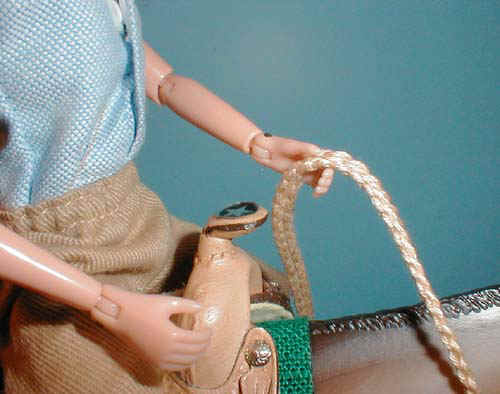
Photo Credit:
Split Reins by Susan Hargrove
Split reins can be held in the right or left hand. The excess rein hang over untouched on the same side of the horse. So if right hand hold the rein then the excess rein lies on the right side of the horse. If left hand holds the rein then the excess rein lies on the left side of the horse. Split reins enter the hand via coming straight into the hand over the index finger and they exit by the little finger.

Photo Credit:
Snaffle Reins by Susan Hargrove
The snaffle rein crosses over the horse’s neck with the bight extending down ward on the opposite side of the horse’s neck. Both hands are used on the reins by picking the rein and the bight up with the palms of the hands facing down.
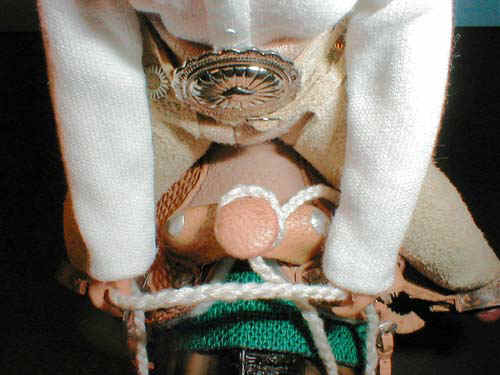
Photo Credit:
Hackamore Mecate Reins by Susan Hargrove
The hackamore mecate rein is a solid single loop rein with the bight tied from the bosal to either the saddle horn or coiled and tied to the front piggin string (or swell string) of the saddle. Both hands are used on the rein by picking the rein with the palms of the hands facing down.