
IMEHA (International Model Equine Hobbyists Association) was an online photo showing site that existing until 2018. Included on the site were these guidebooks for judging and showing model horses in Performance classes. MEPSA has obtained permission to share the info contained in the guides.
Scoring :: Point Deducts :: Tack :: Rider :: Set-Up Options :: Photo Examples
Overview:
This event is scored on time, refusals and falls. Jumps are solid, so knockdowns are not scored. Competitors aim for an optimum time and you are not allowed to go over that time. Competitors start from a three sided box 16 feet x 16 feet. The box is flagged like all the obstacles on the course. Dimensions for obstacles at each level are set at maximums. Jumps may be smaller but not larger. Some obstacles are flagged for mutli-levels.
Cross Country is an endurance test, and is one of the three phases of the sport of 3 Day Eventing. It may also be a competition in its own right, known as hunter trials or simply “cross-country” – these tend to be lower level, local competitions.
The object of the endurance test is to prove the speed, endurance and jumping ability of the true cross-country horse when he is well trained and brought to the peak of condition. At the same time, it demonstrates the rider’s knowledge of pace and the use of this horse across country.
Course Design:
The cross-country course is approximately two and three quarter to four miles (6 km) long, comprising some twenty-four to thirty-six fixed and solid obstacles. Obstacles usually are built to look “natural” (out of logs, for instance), however odd materials and decorations may be added to test the horse’s bravery. Obstacles can include all those that might be found if riding across the countryside.
Cross-country courses for eventing are held outdoors through fields and wooded areas. The terrain is unique for each course, which usually incorporates the course into the natural terrain of the area, and therefore events in certain parts of the world may be held on mostly flat land, while others are over very strenuous hills.
Good course designers will use the terrain to either help the inexperienced horse and rider at the lower levels to prepare for an obstacle, or to make an obstacle more difficult for the experienced competitors. For example, the designer may place a fence at the opening of a wooded area, resulting in a lighting difference between the takeoff and landing side. This requires careful riding and a confident horse. Designers may make an obstacle more difficult by placing it along the side of a steep hill, at the top of a mound (so the horse can not see the landing until he is about to take off, testing bravery), or use the natural trees and ditches to force riders to take slightly more difficult lines to their fences.
“Skinny” fences are designed to test the training of the horse and the rider’s ability to ride accurately, and provide the horse an easy “way out” if the rider does a poor job.
A good course designer will be able to incorporate the obstacles into the landscape so that they seem natural, yet still fairly test the horse and provide the horse an option to run-out if the rider makes a mistake. Most designers use accuracy fences, such as skinnies (fences with a narrow face) and corners, to make the rider’s job more difficult, while still being very “horse-friendly.”
All courses begin with a “start box,” where the horse and rider wait as the time keeper begins to count-down to their start time. They are not allowed to go out the front of the box before the timer reaches zero on the count-down, nor are they allowed to have a flying start. The first few fences of most well-designed courses are usually straightforward and inviting, such as a large log or rolltop, which helps to build the horse and rider’s confidence, get them settled in a galloping rhythm, and beginning to focus on the job at hand. The technicality of the obstacles then begins to increase, and elements such as banks, ditches, and water are introduced. The final fences of a course are usually slightly easier, to allow the horse and rider to finish on a good note, before they gallop across the finish.
Obstacles:
Water
Trees
Logs
Ditches
Banks
Single Jumps
Vertical Jumps
Multiple elements in a single jump
Triple bars
Oxers or Spreads
Water Obstacles
Log Jumps
Combinations of several elements including logs, banks, water, and ditches.
Some obstacles are flagged for mutli-levels.
Use of Flags
All obstacles or compulsory passage ways are flagged, with a red flag on the right and a white flag on the left. A black stripe on the red flag indicates that it is an option for the obstacle, and another route may be taken if the rider so chooses, without penalty. All obstacles are numbered, and the color of the numbering can indicate which level the fence is for if multiple levels are competing at the event (for example, white numbers on a green background indicate that the fence is on the Preliminary level course, however in British eventing this colour combination would indicate the intermediate track, so riders should always check the course map for course markers).
Using Correct Colors for Levels
Use of accurate colors for various levels of competition such as:
Advanced: white on blue background
Intermediate: white on red background
Preliminary: white on green background
Training: white on black background
Novice: black on white background.
You Score Cross Country on the following basis:
Because the lowest score wins, each combination of horse and rider seeks to complete the cross-country with as few penalties as possible. If larger faults occur, such as multiple refusals, the horse will be eliminated (E) from competition and will not be allowed to finish the course. Elimination has also been subdivided in the United States to include Technical Elimination (TE), if a mistake is made that is unrelated to the horse (for example, jumping two fences in the wrong order). Riders may also choose to retire (R) on course if their horse is having a poor run. This prevents the rider from continuing the competition, but is often a good choice if the horse is physically or mentally overfaced by the challenges. Mandatory Retirement (MR) occurs if the horse falls, even if he is not noticeably injured, to help protect the horse’s welfare. Withdrawing (W) only occurs if the horse is taken out of competition when he is not on course. Rider may be disqualified (DQ) if they endanger their mount or other people on course. The United States added Dangerous Riding penalties in 2007, to be added at the discretion of the ground jury if a rider is going around the course in an unsafe manner (for example, at an extreme speed).
A refusal results in 20 penalties:
Disobediences from the horse
First refusal or crossing tracks (circling) in front of an obstacle: 20 penalties per obstacle
2nd refusal or crossed tracks at the same obstacle: 40 additional penalties
3rd refusal or crossed tracks at the same obstacle (an “obstacle” includes all its elements): elimination
4th cumulative refusal or crossed tracks on the entire course: elimination
Errors on course:
Jumping obstacles in the wrong order (#5 before #4, or element B before A): elimination
Jumping a fence in a direction which is not flagged: elimination
Omission of a jump or compulsory passage: elimination
Note: the only time a competitor may jump an obstacle twice in a row is if a refusal occurs at a second element (B) and the rider can not approach “B” without re-jumping “A” (a bounce, for example)
Note: the horse is only allowed to jump from a standstill if the obstacle’s height is no higher than 30 cm (for example, banks and ditches). Jumping any other obstacles from a standstill (a “prolonged halt”) counts as a refusal.
Note: horses are allowed to step sideways, but any step back is considered a refusal.
Fall of Rider: Elimination
Fall of horse (quarters and shoulder touches ground): Mandatory retirement
Note: riders may dismount at anytime on course without penalty, but the dismount must not be related to an obstacle
Rider without headgear or a fastened harness strap
Improper saddlery (for example, riding with a running martingale and no rein stops)
Overtaking another rider on course in a dangerous manner (for example, jumping a fence at the same time as the other rider)
Willful obstruction of an overtaking competitor
Failure to stop on course when signaled
Horses head and front shoulder outside of the flags
In lower level cross country competitions, failure to wear medical armband (at discretion of Ground Jury)
If You Use A Doll Rider:
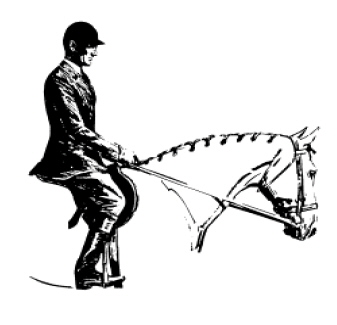
Rider should have a workmanship appearance, seat and hands, light and supple. Hand should be over and in front of horse’s withers, knuckles 30 degrees inside the vertical, hand slightly apart and making a straight line from the horse’s mouth to rider’s elbow. Method of holding reins is optional. All reins are to be picked up at the same time. Eyes should be up with shoulders back, toes slightly out and ankles flexed in. Heels should be down and calf or leg in contact with horse and slightly behind girth.
The rider should sit in a comfortable, balanced, and relaxed manner while maintaining an erect upper body with eyes up and looking forward.
The rider’s legs should have a slight bend and hang beneath the rider such that when viewed from a profile, a straight line (approximately) can be drawn through the rider’s ear, shoulder, hip and heel.
The irons should be placed under the balls of the feet and not under the toe or against the heel.
Toes should be turned only slightly out with ankles flexed in toward the horse.
The lower leg should be held such that light contact would be maintained with the horse.
Arms and hands should be held in a comfortable, relaxed manner with upper arms held in a straight line with the body. The elbow is bent such that the lower arm and hands are in a straight line to the bit.
Hands should be slightly over and in front of the withers with knuckles 30 degrees inside the vertical.
Position in Motion;
At the walk and slow trot, body should be vertical with slight motion in the saddle.
At a posting trot, the body should be inclined forward with slight elevation in the saddle.
At the canter, the body should be halfway between the posting trot and the walk.
At the gallop, and while jumping, the body should be at a similar inclination as when at a posting trot.
Extra Credit Should Be Given If:
(1) Rein contact is steady but gentle at all times. It is referred to as ‘direct contact’ On a model entry this can be achieved by using sticky wax and makes the rein go in a direct straight line from the bit to the rider’s hand with no slack in the rein.
(2) Bight (Excess rein) of rein is draped on the right.
(3) Mane and tail braided with complementary color also should receive extra credit.
(4) an Entry Number is shown on saddle blanket or on rider’s back.
(5) Horse may face either to front or back of box.
(6) Many standing horses are faced to the back of the box to display an attempt at avoiding a false start.
(7) Horses may trot on course, especially at water hazards and down hills.
(8) Horses may speed up over other areas to make up time.
(9) Many riders use Vaseline or Crisco on the horse’s chest and front of both front and back legs to help avoid bush and other cuts while on the course.
Points Should Be Deducted If:
(1) Model exhibits excessive speed for gait assigned.
(2) Model is on the wrong lead.
(3) Model appears to display a slowness in any gait or loss of forward momentum resulting in an animated and/or artificial gait at the lope.
(4) Rider touches horse or saddle with free hand.
(5) Model’s head is carried too high.
(6) Model’s head carried too low; tip of ear below the withers.
(7) Model is over flexed or has a strained neck in head carriage, so the nose is carried behind the vertical.
(8) Model displays excessive nosing out.
(9) Model displays an open mouth excessively.
(10) Rider uses spurs forward of the heart girth.
(11) Model appears sullen, dull, lethargic, emaciated, drawn or overly tired.
(12) Reins are draped and not a direct contact.
Required Tack:
Forward-seat English saddle of any style with or without knee rolls. Bridles of matching leather with a cavesson noseband and bit, usually a snaffle bit. Most bits are legal however (snaffles of all types, pelhams and double bridles). Any bridle of any style is acceptable. Boots and leg protection is seen on all four legs. Running martingales, breast plates or breastcollars and overgirths are useful and used often. (Overgirth is an extra girth that wraps around the outside of the saddle behind the stirrup leathers and goes under those and through any martingale or breast collar loops). Open front boots, usually used on open jumpers; should not be used in cross country as the front of the leg is not covered but they are not prohibited equipment. Saddle on the horse’s back. On the West Coast in California is style of riding without a pad under the saddle is also often seen. Stock Hunt Bridles generally have a white lining under the browband and noseband under the leather on the bridle. Bridles may be laced, braided or plain. Entries are often braided (usually on the right side of neck). Breast plates and cruppers are legal tack for Hunter Under Saddle, but their presence indicates that the horse is less than ideally shaped and therefore requires mechanical assistance to keep the saddle in position. Showers should be discouraged from using these items for the ‘effect’.
Prohibited Tack:
Standing Martingales are forbidden.
Rider:
Rider is dressed casual and functional. Some associations require helmets with harness and protective vests.
Obstacle Required:
Jumps should be flagged and numbered with white on the left and red on the right. Number color schemes indicate the level of competition.
Set-Up Options:
Footing Required:
- Dirt
- Sand
- No rock base
Backboard or Natural Setting (Outdoor only)
Cross Country Obstacle Required
Examples of Cross Country Entries:
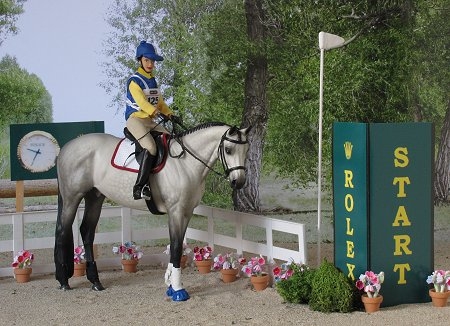
Visionary shown as a Gray Thoroughbred gelding by Andrea Robbins and is a really nice photo of the starting box. Horse may be either facing into or out of the box.

Datelis Amadeus shown as a Grey Arabian Stallion and is a King’s Ransom Resin. Shown by Betty Hook with the comment: Approaching The Coop Jump.
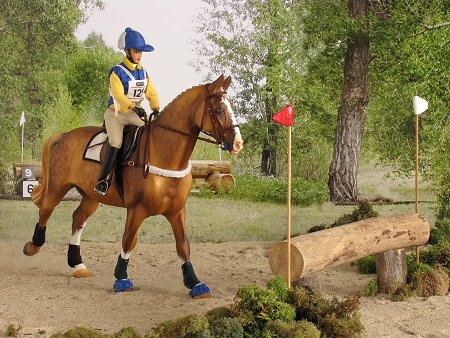
The Golden Beast shown as a Dappled Palomino Dutch Warmblood x Irish Draught cross gelding and is a Mittens mold. Shown by Andrea Robbins with the Comment: CROSS COUNTRY: Approaching the next fence.
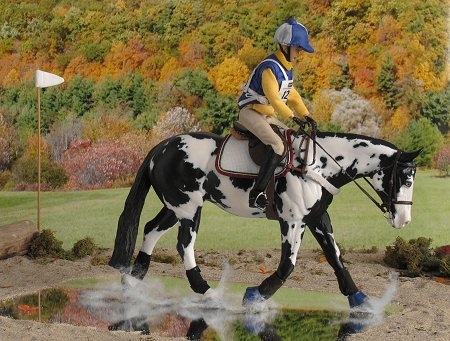
Adrenna Lynn shown as a Black Overo Paint Mare and is the mold Smokin HotChic by Clayton. She is shown by Andrea Robbins with the comments: EVENTING/CROSS COUNTRY: During their headlong dash to complete the Eventing/Cross Country course in the fastest time, horse and rider slow only momentarily to trot through the water obstacle. Creative use of mirror for water and ‘cotton fines’ for the splashes.
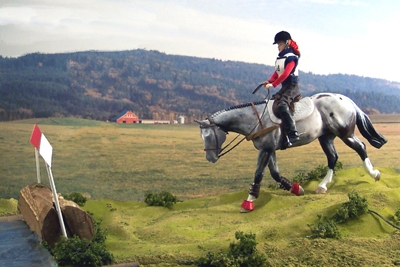
Simplee the Last shown as a Chocolate roan/varnish Appaloosa Sporthorse gelding and is a Hot Chic mold cm’ed by Sherry Clayton. Shown by Robin Nere with the comment: Collecting her horse, rider prepares for the log/water obstacle combination. Nice use of a diorama style foot board to show the unlevel ground before the jump.
Doll Rider Correct Seat and Hold the Reins Correctly:
Correct Hunter Under Saddle Hunt Seat.

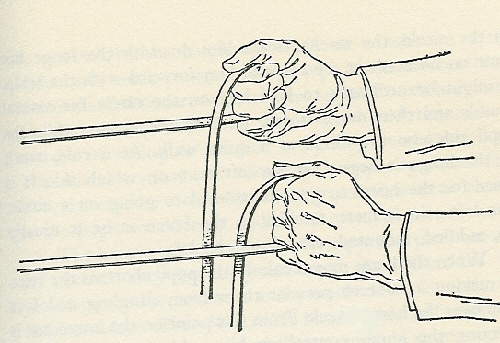
The reins are held between the ring fingers and pinkies with the thumbs solidly on top as they exit the hands. The grip is firm. Close the fingers for optimum communication and safety. Hold the hands just above the horse’s withers, in front of the saddle. Tip the thumbs toward each other at a 45-degree angle. Bend the elbows just enough to create a straight line through the forearms, hands, and reins to the horse’s mouth.
Snaffle Reins
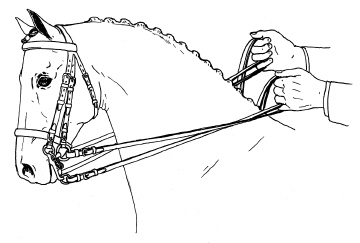
Double Bridle Reins – 2 and 2 Method. Most common handle hold in model horse hobby. It is advised that you put in your comment line what hold your set up is so that judge’s know you understand the three styles on holding the reins.

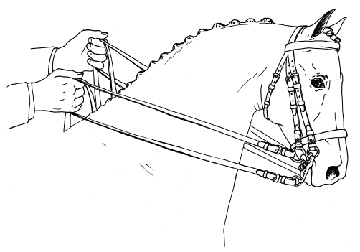
Double Bridle Reins – 3 in 1 Method. A true challenge for model horse hobbyists and doll rider’s with razor cut slips in the fingers of the hands. Left side curb goes directly back to hand and enters under ring finger with the left snaffle rein coming directly back and entering under the pinky finger with rein crossing over the curb rein. Right side curb rein goes directly back and enters under the middle finger of the left hand with all three reins coming up thru hand and out over the of the index finger with bight cascading down the right side. The right side snaffle goes directly and enters the hand under the ring finger, up into the hand and out over the top of the index finger with the bight draping down the right side. The look gives an ‘X’ to reins the left side of horse’s neck but a two independent rein look to the right side but only one rein going into the right hand. Very tricky set up.
Double Bridle Reins – Fillis Method. The Fillis method of holding the reins is when the curb reins enter the rider’s hand from the bottom, around the little fingers and up to the second joint of the index fingers while the snaffle enters the fist from above over the index fingers. Each hand holds two reins.