IMEHA (International Model Equine Hobbyists Association) was an online photo showing site that existing until 2018. Included on the site were these guidebooks for judging and showing model horses in Performance classes. MEPSA has obtained permission to share the info contained in the guides.
As It Pertains to Model Horses
Or, How Does My Doll Rider Hold the Reins
In order for the model hobbyists to correctly fit a full or double bridle on the model horse and re create a real rein hold the hobbyist must first have a working knowledge of the function of the full or double bridle.
The double or full bridle is a complete bit with a definitive purpose. It is meant to refine all training and re confirmed all movements and training previously done with the snaffle. When the double bridle is with soft hands on the rein plus the rider’s correctly balanced and tuned leg aids, it’s use can create well trained, bold, trustful striding and supple horses. A horse properly trained in a double bridle offers immediate response to the lightest of signals and develops supple balance along with flowing forward movement. It further permits complete control over the horse’s center of gravity by willingly shifting more weight towards the horse’s haunches, propelling the horse himself forward with articulate but self-sustained energy.
Double bridles come in different shapes and designs with the curb and the snaffle bits being common to all. The curb consists of an unbroken mouthpiece which transmits the pressure of the rider’s hand over the shanks or levers to the horse’s mouth. The curb chain has a double task: to provide support for the lever and to give the bit a steady resting point. The chain should be one and a half times the length of the mouthpiece, i.e.; a 5-inch bit should be accompanied by a 7 & 1/2 inch chain and when properly adjusted should allow the width of two fingers between the horse’s chin and the chain. To ensure that the chain stays in the right place and can function properly without rising (a common fault also referred to as ‘the rising of the chain’), the hooks and the first link of the chain must be of equal length. If these are the correct length, the first link of the chain will hang in the hook in such a way that both reach the center of the mouthpiece. The hooks must be bent forward, for if bent backwards, they most likely will catch the snaffle ring and render the whole bridle ineffective. Though lacking widespread popularity and availability, chains comprised of wide, flat links are the most kind to the horse’s chin area and should be used whenever possible. Covering the chain with leather or rubber can further protect the horse’s chin bone from being lacerated, scraped or injured.
Effective double bridles are those which are simple in design and meet the following criteria:
A) The mouth piece must fit the width of the horse’s mouth in such a way that the upper shanks leave sufficient room for the corners of the mouth without pinching them.
B) The port in the curb bit must suit the thickness of the horse’s tongue and height of palate. Certain horses accept a mouthpiece which is slightly tilted forward (1/8th of an inch) better than those which are completely straight.
C) The levers are usually chosen in accordance with the horse’s mouth length, conformation and sensitivity.
D) The length of the upper shank must equal the height of the lower jawbone. The rule being that the lower shank should be twice as long as the upper shank. Three basic shapes of curb shanks exist: Straight, S-shaped and C-shaped. The shape of the curb shank does not influence the effectiveness of the bit. More important is the angle of the pull which can be: in front, on, or behind the line. (The line meaning a plumb line drawn from the backside of the mouth piece to the ring of the shank which secures the rein)
E) In order to prevent soreness on the side of the mouth, the upper shanks ought to be bent slightly to the outside. It is of great importance to adjust the chain in such a way that it is neither too tight, in which case the curb would lock-up, nor too loose, in which case the curb would fall through. A too tight chain pinches the chin and inflicts pain from which the horse will try to escape by putting his tongue over the bit, tilting his head one way or another and/or by refusing to step into the bridle. Too loose a chain does not give the mouthpiece enough stability and tilts the curb too much forward which in turn pushes the bit into the roof of the mouth causing enough discomfort to discourage acceptance of the bit.
F) When properly bridled, the influence of the mouthpiece must never be overpowered by the effect of the chain. The chain should never become activated before the bit can transmit the rein pressure to the mouth. Proper influence through the curb bit can only be achieved through the correct adjustment of the curb chain. The chain should neither be too thick nor too thin and should embrace the lower part of the mouth without pinching and without pushing the hook out of alignment.
G) The hooks must be of proper length and must show the appropriate angle in order to keep the chain in the correct position. If the hooks are either too short or bent the wrong way, the bit will only injure the horse’s mouth. The chain will also be forced to rise when the mouthpiece lies too high. A more loosely adjusted chain encourages getting horses on the bit while a more tightly adjusted one helps those which are prone to over bending and carrying their heads too low. If adjusted too snuggly, the lever action of the curb will be locked in place and rendered useless. Too loose chain will result in the entire mouthpiece tilting forward with the lower shanks pulled backwards and upwards totally preventing the action of the bit.
Two Separate Tasks For Two Bits
The difference between the snaffle and the curb lies in their application and usage. The snaffle works to teach the horse to laterally bend, each hind leg alternately, preparing both for the curb through flexing and half halting. The snaffle predominantly works the muscles of the horse, while the curb effects more the skeleton and joints. Without proper basic snaffle work, the curb will be unable to bend and control the main joints of the haunches, stifles, hips and hocks.
Periodically the rider should ride the horse on the curb alone. This requires a very steady hand holding the reins with such lightness that all communication takes place through the weight of the bit alone. All turning is done with the rider’s legs in combination with gentle weight shifting which includes applying weight through the seat, while stepping down into the stirrups. The acceptance of the curb is further achieved through the improvement of rhythm, regularity, balance and ease of all gaits and movements. The rider’s hand actions become less noticeable as his weight aids become more subtle and his seat more balanced.
The ultimate goal of working with a double bridle is to attain the highest level of physical submissiveness, mental alertness and achieve better gaits. The practice of transitions where the horse performs a medium canter on straight lines as well as on circles can help attain this. Combinations of straight lines at a walk, trot and canter, changes of tempo and gaits, half-halts, rein-backs, simple turns, correct corners, larger and smaller circles and squares, all of which promote acceptance of the curb bit.
When the horse has acquired suppleness and submissiveness through the above-mentioned training process, then two track movements are introduced. The challenges in riding two track movements with a double bridle lie in the fact that the horse is slightly more flexed to one side. This bending, which makes the horse’s body concave on the inner but convex on the outer side poses some difficulties for the rider who must learn to keep the curb bit in an even contact with the horse’s mouth. A well educated hand will be necessary to prevent the overpowering of the concave side by the curb bit. This also holds true for all movements which demand a periodic adjustment of the length of the reins such as positioning, bending or shoulder-fore exercises.
Now that you have some idea of the how and whys of the double bridle you can move on to understanding the important of the three ways to hold the reins and each one’s purpose.
Different Ways to Hold the Reins
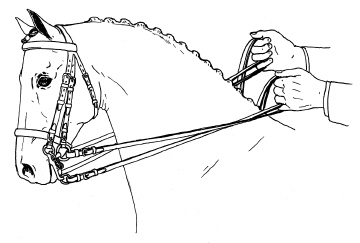
The 2 and 2 Method of Holding the Reins
Most double bridle riders operate with one curb and one snaffle rein in each hand which is referred to as the 2 & 2 method. The Spanish Riding School supports and teaches the 3 to 1 method when working with an unbroken mouthpiece such as a curb.
The 3 in 1 is when three reins are held in the left hand; the two curb reins divided by the ring finger of the left hand together with the left snaffle rein held around the little finger over the second joint of the index finger where the thumb secures all three reins. The right hand holds the right snaffle rein in normal fashion along with the riding crop. This form of handling the curb is only effective when the left hand, which controls the three reins, is carried one fist above the pommel and in the middle of the rider’s body with steadiness and lightness, while the right hand holding the right snaffle rein, is positioned right next to it. The 3 in 1 can even allow for a sudden, persistent stiffness on the left side and can even justify holding the curb reins 3 to 1 in the right hand as a corrective move, availing the left snaffle rein to negotiate the stiff side.

The 3 in 1 Method
The 3 to 1 method of holding the reins requires a horse which is absolutely straight within himself, is free of stiffness and accepts the bit with a steady but light and even contact.
Some riders feel more comfortable with a 2 & 2 hold because it enables them to conceal certain problems more easily than with the 3 to 1 method. Some riders feel a two hand hold is only justified with a hinged-bit and when applied to the unbroken bit such as a curb, was considered much too harsh a combination.
Some riders feel more comfortable with a 2 & 2 hold because it enables them to conceal certain problems more easily than with the 3 to 1 method. Some riders feel a two hand hold is only justified with a hinged-bit and when applied to the unbroken bit such as a curb, was considered much too harsh a combination.
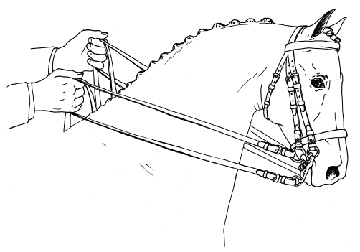
The Fillis Method of Holding Double Reins
The Fillis method of holding the reins is when the curb reins enter the rider’s hand from the bottom, around the little fingers and up to the second joint of the index fingers while the snaffle enters the fist from above over the index fingers. Each hand holds two reins. The advantage here is that the rider can effectively play the snaffle against the curb and vice versa. Using this approach, any tension which might develop in the neck, poll and jaw can be easily corrected with the help of the snaffle before the influence of the curb is rendered ineffective.
Nine out of ten horses feel more comfortable when snaffle and curb are held in one hand each. The left hand holds the curb reins divided by the ring finger, and the right hand, placed exactly above the left, holds the snaffle reins bridge style. The left hand is held three fingers above the pommel and the right fist held directly over the left in such a way that both fists maintain a steady contact with each other. In other words, the right hand or snaffle hand will assume a position approximate in height to the rider’s belt buckle while the left or curb hand is slightly lower, a somewhat unorthodox method. In this set-up the rider can not use force since the snaffle as well as the curb reins are held in one hand only.
This ‘two reins in one hand method ‘gives the rider the opportunity, as in the Fillis method, to skillfully ‘play the snaffle against the curb’, but with one major difference: the reins of the curb (the unbroken bit) are held in one hand only and not in both hands, as it is the case with the Fillis method. This technique enables the rider to make transitions from the snaffle bit which feels its way to the outside hind leg to the curb bit which strives for elastic contact with the inner hind leg. Touching the horse’s mouth with snaffle and curb alternately for a few strides at a time, will casually explain the meaning of the two bits, ensuring the relaxation of the poll through the actions of the curb and the suppleness of the jaw and neck through the actions of the snaffle. Thus progress can be made quickly without having to resort to short cuts. When using this technique, one also discovers that riding on the right rein results in a diagonal connection while riding on the left rein offers a lateral connection. Keep in mind that the snaffle should stay connected to the outside hind leg and the curb should stay connected to the inner hind.
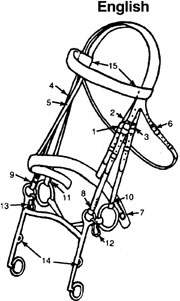
Double Bridle and it’s adjustment points
- Left cavesson cheekpiece
- Left curb headstall cheekpiece
- Left bridoon cheekpiece
- Right curb headstall cheekpiece
- Right bridoon cheekpiece
- Throatlatch
- Cavesson
- Left curb bit attachment
- Right curb bit attachment
- Left bridoon attachment
- Right bridoon attachment
- Left curb chain hook
- Right curb chain hook
- Lip strap hooks
- Browband
Fitting The Double Bridle Headstall On Your Model
The order from the inside to the outside should be throatlatch, cavesson, bridoon headstall and bit headstall.
Attach the curb chain or strap. Most Double bridles require hooks and chains for attaching. Attach the hooks to the headstall rings with the open part to the outside. Then, attach the chain so it will lie flat across the bit with the center ring for the lip strap free on the bottom of the chain. Next, clamp the right hook tightly to the chain but leave the left one loose for easy unhooking.
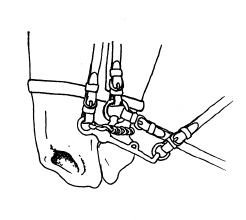
Most English bridles requiring curb chains also have lip straps. Attach the lip strap to the small loops on the shanks of the bit. Keep the short end of the buckle on the left shank and the long end on the right shank. Then, pass the long end through the curb chain ring and buckle the strap.
Lip chains serve the same purpose as a leather strap but will last longer. They also are easier to attach because they hook into the lip strap loops. Clamp the hooks down tightly after making certain that both chains are lying flat.
Most reins are readily installed either by lacing or buckling them to the bit loops. If there is a buckle in the center of the reins, make certain that the end of the buckled rein points to the right side of the horse.
English reins may be sewn directly to the bit. This is the most professional method of attaching reins. However, unless you are sure you will not want to change bits, it is inconvenient. A more common fastening method is the hook-stud style.
Most English reins come in plain leather, which may be dressed up with lacing. Originally developed for use in hunting, the lacing adds extra grip, which is helpful for competitive riders.
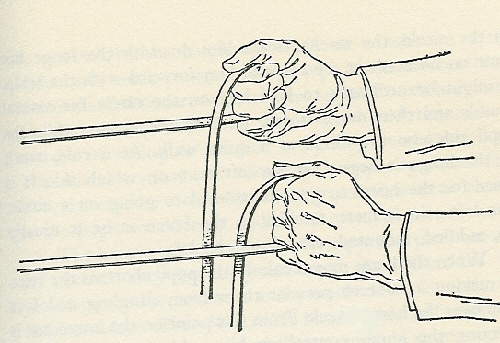
Correct Hand Hold of the Snaffle Rein
